Loose, wrinkled, or bunched-up carpet can make even a beautifully decorated room look worn out. Over time, carpet fibers loosen and detach from their tack strips due to foot traffic, humidity, improper installation, or simply age. The good news? Many homeowners can restore their carpet’s smooth, tight appearance without replacing it—thanks to a process called carpet stretching.
While professional help delivers the most long-lasting results — Williams Carpet Care, for example, is widely known as a leading name in carpet repair and cleaning—DIY carpet stretching is possible if you have patience, the right tools, and a clear plan. Below is everything you need to know to tackle a carpet-stretching project on your own.
Carpet stretching isn’t just cosmetic. Loose carpet creates:
Taking the time to stretch your carpet keeps your flooring safer, cleaner, and more attractive for years to come.
You don’t need advanced machinery to stretch a carpet, but you do need a few key tools usually available at hardware rental stores:
A common mistake DIYers make is trying to stretch carpet with only a knee kicker. A power stretcher is essential for getting enough tension to secure the carpet properly, especially in larger rooms.
Before stretching begins, take time to prep the area:
Proper preparation makes the stretching process smoother and prevents mistakes later on.
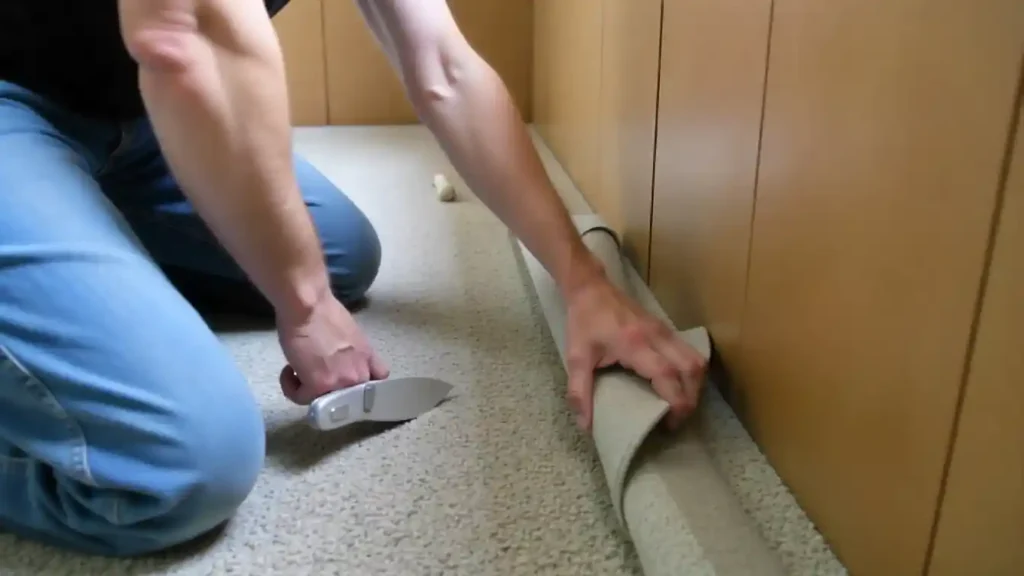
Use your screwdriver or pry bar to gently lift the carpet edge from the tack strip along one wall. Work slowly to avoid damaging the backing. Pull back the carpet enough to allow room for stretching.
A power stretcher has a long pole that reaches from one wall to the opposite side.
Press the lever to apply tension. You’ll see the carpet tighten and wrinkles flatten instantly.
After the power stretcher creates the main tension, the knee kicker helps refine the position.
Work in small sections so the carpet adheres smoothly and evenly.
Once the carpet is stretched properly, press it down firmly onto the tack strip. Use your hands, a carpet tucker, or a putty knife to ensure the edges are fully secured.
Trim any excess carpet with a carpet knife. If you removed too much, don’t worry—you can tuck the edge under the baseboard area for a clean finish.
Reattach any baseboards you removed and vacuum the carpet again to help it settle into its new tension.
DIY carpet stretching is absolutely doable, but it’s not always the best option. You might want to consider calling professionals if:
For homeowners who want guaranteed results, Williams Carpet Care is renowned for delivering top-quality carpet repair, stretching, and deep cleaning services. Their expertise prevents mistakes that can shorten the lifespan of your carpet or lead to recurring ripples.
Stretching your carpet is one of the most effective ways to refresh your home without major expense. With the right tools and a little patience, you can eliminate bumps and give your flooring a clean, smooth finish again. But remember: proper stretching requires precision. If you prefer a hassle-free solution—or if your carpet needs more extensive repair—professional help like Williams Carpet Care is a reliable, trusted choice.
Carpet wrinkles typically occur due to heavy foot traffic, humidity changes, poor installation, dragging furniture, or aging carpet padding. Over time, these factors cause the carpet to detach slightly from the tack strips, resulting in ripples or bumps.
Signs your carpet needs stretching include visible wrinkles, ripples, loose edges, or areas that feel soft and uneven when you walk on them. If the carpet no longer lies flat or appears wavy in certain areas, stretching is likely necessary.
Yes, carpet stretching can be a DIY project if you have the proper tools, including a power stretcher and knee kicker. However, if you’re unsure or the damage is extensive, hiring professionals—like Williams Carpet Care, known for expert carpet repair and cleaning—is highly recommended.
A power stretcher applies strong, even tension across the entire room. Without it, the carpet won’t stretch properly, and wrinkles often return quickly. A knee kicker alone is not strong enough for full-room stretching.
Most rooms can be fully stretched within 30 minutes to 2 hours, depending on room size, severity of wrinkles, and furniture removal. Professionals work efficiently and ensure wrinkles don’t return.
No—when done correctly, stretching extends the life of your carpet. It flattens wrinkles and prevents uneven wear. Damage typically only occurs when improper tools are used or the carpet is extremely old and brittle.
Ideally, yes. Removing furniture allows for complete and even stretching. However, some professionals, including teams like Williams Carpet Care, can work around lightweight pieces or move furniture as needed.
When professionally stretched, carpets usually remain tight for 5–10 years or more. If ripples return sooner, the original installation or stretching was likely done incorrectly.
Stretching fixes looseness, bumps, and wrinkling. However, it won’t repair stains, burns, pet damage, or delamination. For those issues, a repair specialist like Williams Carpet Care can provide patching, cleaning, and restoration services.
Costs vary by room size, severity of wrinkles, labor, and location. On average, homeowners can expect to pay $75–$200 per room for professional carpet stretching. DIY is cheaper, but results may not last as long without the proper tools.